

To get to the entrance of Bean Valley, We will have to make our way back to the desert area of Lands End and scale up the cliff where the Sky Troopas have set up a training course.
You can find the directions on how to reach the entrance to Bean Valley in our Lands End Walkthrough in Super Mario RPG
Table of Contents
- Bean Valley
- Enemies in the area
- Lands end monsters
- Shy Away
- Spinthra
- Kriffid
- Geckit
- Chewy
- Stinger
- Fink Flower
- Chomp chomp
- Boy Box
- Fautso
- Lands end monsters
- Area 1 Bean Valley entrance
- Area 2 hidden chest area
- Area 3
- Boss Fight (Smilax and Megasmilax)
- Mini-Boss battle Smilax (stage 1)
- Boss fight Megasmilax (stage 4)
- Magic Beanstalk (Bean Valley Cloud Area)
- Cloud area 1
- Cloud area 2
- Cloud area 3
- Cloud area 4
- Cloud area 5 (crossroads)
.
Scale the Sky Troopa Course within 12 seconds will give you the Troopa Pin which is another unique item that boosts your attack and defense. You can find the details of this item in our guide on How to get the Troopa Pin in Super Mario RPG.

A shorter way to get to the Bean Valley entrance is to make your way back to Belome Temple to where you pay the shaman 100 gold coins to access the trampoline to take you to the entrance of the Sky Troopa Course and make your way up the cliff to the entrance. You can find directions for this at the Shortcut to Lands End Area 5 section of the Lands End Walkthrough.

Head to the top of the Cliff in the Sky Troopa Course and take the exit behind the Sargeant at the end of the course to reach the entrance to Bean Valley.
Bean Valley

The recommended level in this area is level 16. You also need to have Mallow at least level 14 with the Snowy skill to make the boss fight in this area easier. There are a number of monsters that you previously encountered in Lands End that and a few new ones that will be making it’s appearance in this level.
We recommend thar you have Toadstool and Mallow in your active party in this area to make the battles easier and faster.
Enemies in the Area
| Name | Hitpoints | Attack | Gold coins | Experience | Weak | Item drop |
| Shy Way | 140 | 90 | 30 | 1 | Ice | Honey syrup |
| Spinthra | 230 | 110 | 4 | 30 | Ice | Bracer |
| Kriffid | 320 | 95 | 6 | 35 | Ice | Bad mushroom |
| Geckit | 100 | 84 | 0 | 18 | Ice | Able juice |
| Chewy | 90 | 110 | 0 | 14 | None | Sleepy bomb |
| Chomp chomp | 150 | 100 | 5 | 12 | Thunder | Crystalline |
| Stinger | 65 | 78 | 1 | 13 | None | Able juice |
| Fink Flower | 200 | 95 | 2 | 20 | Fire | Mid mushroom |
| Boy Box | 900 | 180 | 150 | 100 | Jump | None |
| Fautso | 420 | 130 | 0 | 5 | Jump, Ice | None |
A number of the enemies in the area have made their appearance in Lands End and most of these mobs are very weak to Ice attacks so it is best that you have Mallow cast Snowy when faced with 4 or 5 monsters attacking in a party.
Land’s End Monsters

The stats and strategies on how to defeat the monsters that first appeared in Lands end can be found here: Lands End Walkthrough/ Enemies in the Area.
Please click on the link to get the see the strategy we recommend when you encounter them
Chomp Chomp

This golden colored chain monster guards the hidden platform to Grate Guys Casino. They can easily be beaten by timed hits or Mallows Thunderbolt skill.
Boy Box

The difficulty when facing Boy Box depends on how good you are in chaining Mario’s Jumps. This monster has around 900 Hitpoints and is immune to thunder skills or spells. To make things worst, Boy Box summons a Fausto to fight beside him after 2 turns and will continue to spawn a companion if you defeat Fausto before finishing him off.

As soon as you start the battle, Have Mario use his super jump or ultra jump Sp. Attack and chain it as long as you can. If you manage to do 30 to 40 chained jumps, you could easily one shot this monster in 1 turn.

When he starts summoning a Fautso to join the fight, Ignore the Summoned monster and focus your attacks on Boy Box. Use Super Jump in Mario’s turn, timed hits for Mallow and have Toadstool defend on her turn and use Group Hug when the party takes damage. Once Boy Box is finished, take out the Fautso to finish the fight.
Fautso

Aside from having high Hitpoints, Fautso can also deal high physical damage to a single party member which makes him deadly right after Box Boy deals AoE spells. When Fautso enters the battle, they could take out an enemy in 2 turns so pressing the A button before their attack hits you will be important to counter block or reduce their overall damage when they attack.
Use jump attacks or Mallows Snowy to deal high damage to them but it’s best to start attacking Fautso only when you defeat Boy Box in the fight. Otherwise, Boy Box will just keep on Spawning Fautso until you get wiped out.
Area 1 Bean Valley Entrance

The Bean Valley entrance will have 2 pipes for you to choose from to take you to the next area. Take the pipe on your right to take you to the next location.
Area 2 Hidden Chest Area

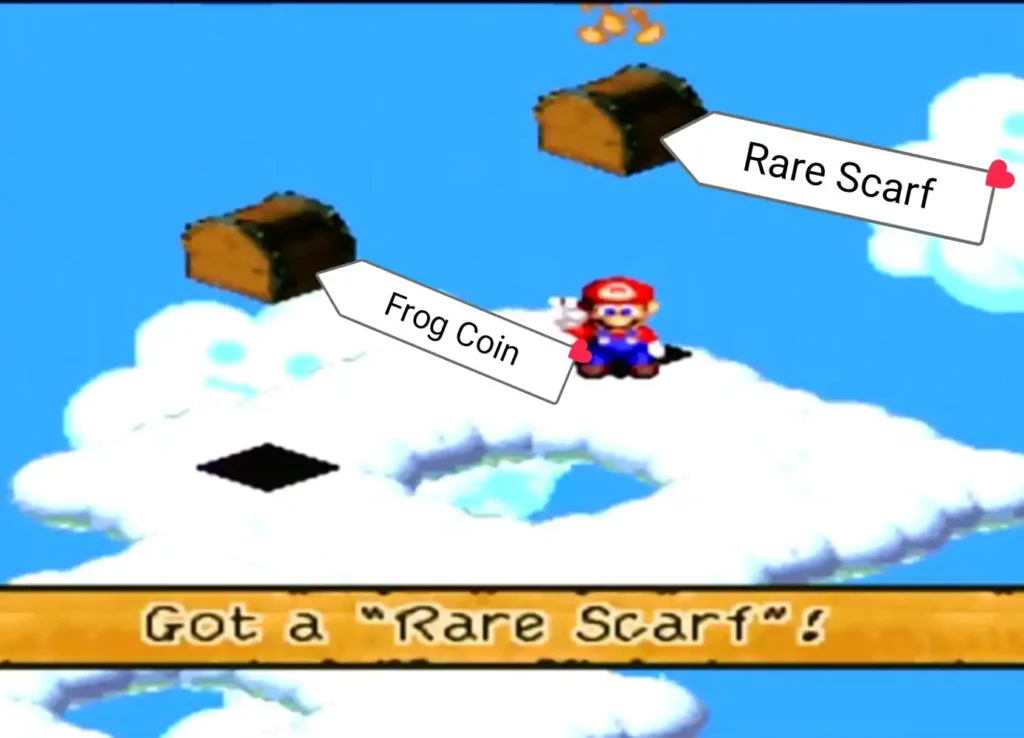
This area will have a hidden chest located at the left corner of the room. Jump once you reach the edge of the room indicated marked on the image above to reveal the hidden chest and take the frog coin inside before moving to the Pipe above you to take you to the next area.
Area 3

Thia area will be guarded by a band of Stingers so use Mallows thunderbolt skill to take them out at once. Afterwards, take the exit located at the top left side of the map to take you to the 1st save area.
Save Area and Pipe Section

To keep things simple, We will be labelling this area as the pipe section. There will be 5 pipes in this area that leads to different underground rooms. These pipes will be blocked by a party of Chewy and a Shy Away will be watering these monster plants for you to battle before gaining access to the pipe it’s guarding.

In this guide, We will be exploring the rooms in order from the pipe to your left then make our way counter-clockwise until we explore all the pipes then move on to the next area. Please note that you can exit the pipes via the trampoline installed in each room underground.
1st pipe (slots chest 1)

This room will have a slots chest at the top right corner of the room. After looting the contents of the chest, head back to the trampoline to take you back up towards the pipe section.
To learn about the slots chest mechanics in the game, please read our guide on the Slots mini-game section in Grate Guy’s Casino.
2nd pipe (slots chest 2)

The Slots chest will be located at the right side of the room in this area. Play the slots mini game and get your reward before heading back to the exit to your left to take you back up to the pipe section.
Hidden treasure chest and Boy Box

Before anything else, Make your way to the left corner of the room and jump to reveal the hidden treasure chest with a frog coin inside. The treasure chest at the top right corner of the room contains a Box Boy for you to fight. After defeating the Box Boy and looting the hidden treasure chest, Head back to the trampoline to take you back up the pipe area.
Hidden treasure chest and 2nd Boy Box

The 2nd Boy Box is inside the treasure chest that is visible as soon as you hop off the trampoline in the room. After defeating the monster, head to the edge of the room and make your way to the top right edge to find another hidden treasure chest.

The hidden treasure chest is below the stairs in this room. Hug the wall and make your way to the top right corner and jump. Afterwards, Exit the area via the trampoline at the bottom left corner of the room to take you back up to the pipe section.
Grate Guy Casino entrance

The final pipe room is where you can unlock a platform to take you to another secret area in the game called Grate Guy’s Casino. To learn more about this hidden area and how to unlock it, Please read our guide on Grate Guy’s Casino in Super Mario RPG.

After exploring the pipe rooms in the area, make your way up and save your game before taking the exit to the Boss Area of Bean Valley.
Boss Fight (Smilax/Mega Smilax)
| Name | Hitpoints | Attack | Gold coins | Experience | Weak | Item drop |
| Smilax | 200 | 100 | 0 | 0 | Ice | None |
| Megasmilax | 1000 | 140 | 0 | 120 | Ice | None |
The recommended level for fighting the Mini-Boss and boss battle is 16. Be sure to have lots of Fp items with you and have Mallow and Toadstool join the active party. Mallow’s ice Sp attack Snowy makes this boss battle a lot easier since this skill can one shot groups of Smilax in a single turn.
Mini-Boss Battle Smilax (stage 1)

There are 4 stages in the Mini-Boss Fight with Megasmilax joining the 4th stage for the final boss battle.
Stage 1 pits you with a single Smilax and after defeating it, A Shy guy summons 2 Smilax for the stage 2 fight, 3 Smilax for stage 3 and finally Megasmilax with 2 Smilax companions for stage 4.
For the 1st stage, Save your Fp and attack with timed hits from Mario and his party to defeat the Smilax.
Stage 2

After Shy Guy waters the downed Smilax and summons 2 Smilax for the 2nd stage of the fight, have your party deal timed hits to both of the Smilax to defeat them.

A faster way to deal with them is to have Mallow cast Snowy on the enemy to wipe them out in a single turn.
Stage 3

When 3 Smilax are summoned in battle for the 3rd stage, They will attack first with morph attacks. HaveToadstool use group hug to remove all negative buffs on the party and have Mallow use Snowy to wipe out the enemy party in 1 turn.
Boss fight Megasmilax (Stage 4)

Megasmilax starts the fight by casting Petal Blast which damages and has a chance of causing sleep to multiple enemies. The Smilax accompanying him will either hit you with basic attacks or Drain. On the 3rd or 4th turn, they use morph skills on their turn.

Have Mallow cast Snowy in his turn to wipe out the Smilax Companions. This way, You can focus all of your attacks on Megasmilax which makes the fight a lot easier.

Continue using Snowy for Mallow and have the rest use timed hits to bring down Megasmilax. Have Toadstool provide healing support or use Fp items when your flower points need recharging.

After the fight, You find out from the rambling Shy Away that He has been given instructions to keep everyone out of Nimbus Land.

After the cutscene, He runs away and drops a note containing a Seed in it. Take the seed with you and exit the area by hopping inside the pipe in the middle of the room.
The seed is 1 of 2 items that you need to get Mario’s final weapon called the Lazy shell as well as Koopas strongest armor. To learn more about how to get them, Please read our guide on How to get the Lazy Shell in Super Mario RPG.
Magic Beanstalk (Bean Valley Cloud area)

As soon as you exit the pipe in this area, jump under the red brick to reveal a magic Beanstalk that reaches up to the clouds. Jump and hit the red brick again to climb up the magic Beanstalk to take you up to the Cloud Area of Bean Valley.
Cloud Area 1
Area overview


The Magic Beanstalk takes you up on the Clouds. You will have to proceed vertically to reach the next areas here. A note will be attached on the 1st beanstalk in this area explaining how to climb up the beanstalk to reach the upper areas. After reading the note, Jump on the beanstalk and make your way upwards.
Cloud Area 2
Area overview


Climb up the green beanstalk and up the yellow beanstalk to reach the next area. On your way to the top, a frog coin can be seen dangling at the left side of the purple beanstalk to your right. To get to it, position yourself opposite the frog coin and press jump while angling your movement controller left to snag the frog coin. Afterwards, climb up the beanstalk again and make your way to the top of the purple beanstalk.
Cloud Area 3
Area overview


On the 3rd Area, Take the red beanstalk to your left and make your way to the top.

Once you reach the top of the red beanstalk, jump up to grab the treasure chest containing a flower tab before jumping towards the purple beanstalk and climb it to reach the next area.

Once you reach the top, jump towards the yellow beanstalk first to get the frog coin dangling beside it. Afterwards, take the green beanstalk to get to the next area.
Cloud Area 4
Area overview


Climb the red beanstalk to take you further up. Then, get on top of the yellow beanstalk and jump towards the green one and climb it to take you further up.

When you reach the top of the green beanstalk, hop on to the purple beanstalk and move upwards to take you to the next area. Don’t forget to grab the gold coins before getting to the top.
Cloud Area 5 (Crossroads)

The final area of Bean Valley is a crossroad where each path takes you to a different area. The top hole will lead you to the Hot Springs which you can access after getting the Star Piece on Nimbus Land, the right trampoline takes you back to the world map, going back to the hole where you made your entrance will bring you back to the cloud area of Bean Valley and the left trampoline will take you to Nimbus Land.
Continue Walkthrough to Nimbus Land & Nimbus Castle in Super Mario RPG